Lettuce Entertain you….

16 Jan

This recipe comes from Ina Garten’s Make it Ahead (2014). I am a huge fan of the Barefoot Contessa. I own every cookbook she has published, tape her Food Network show every week, and had the pleasure of seeing and hearing her story when she made a live appearance in Minneapolis a couple years ago.  Expect to see more of her recipes in the weeks ahead!

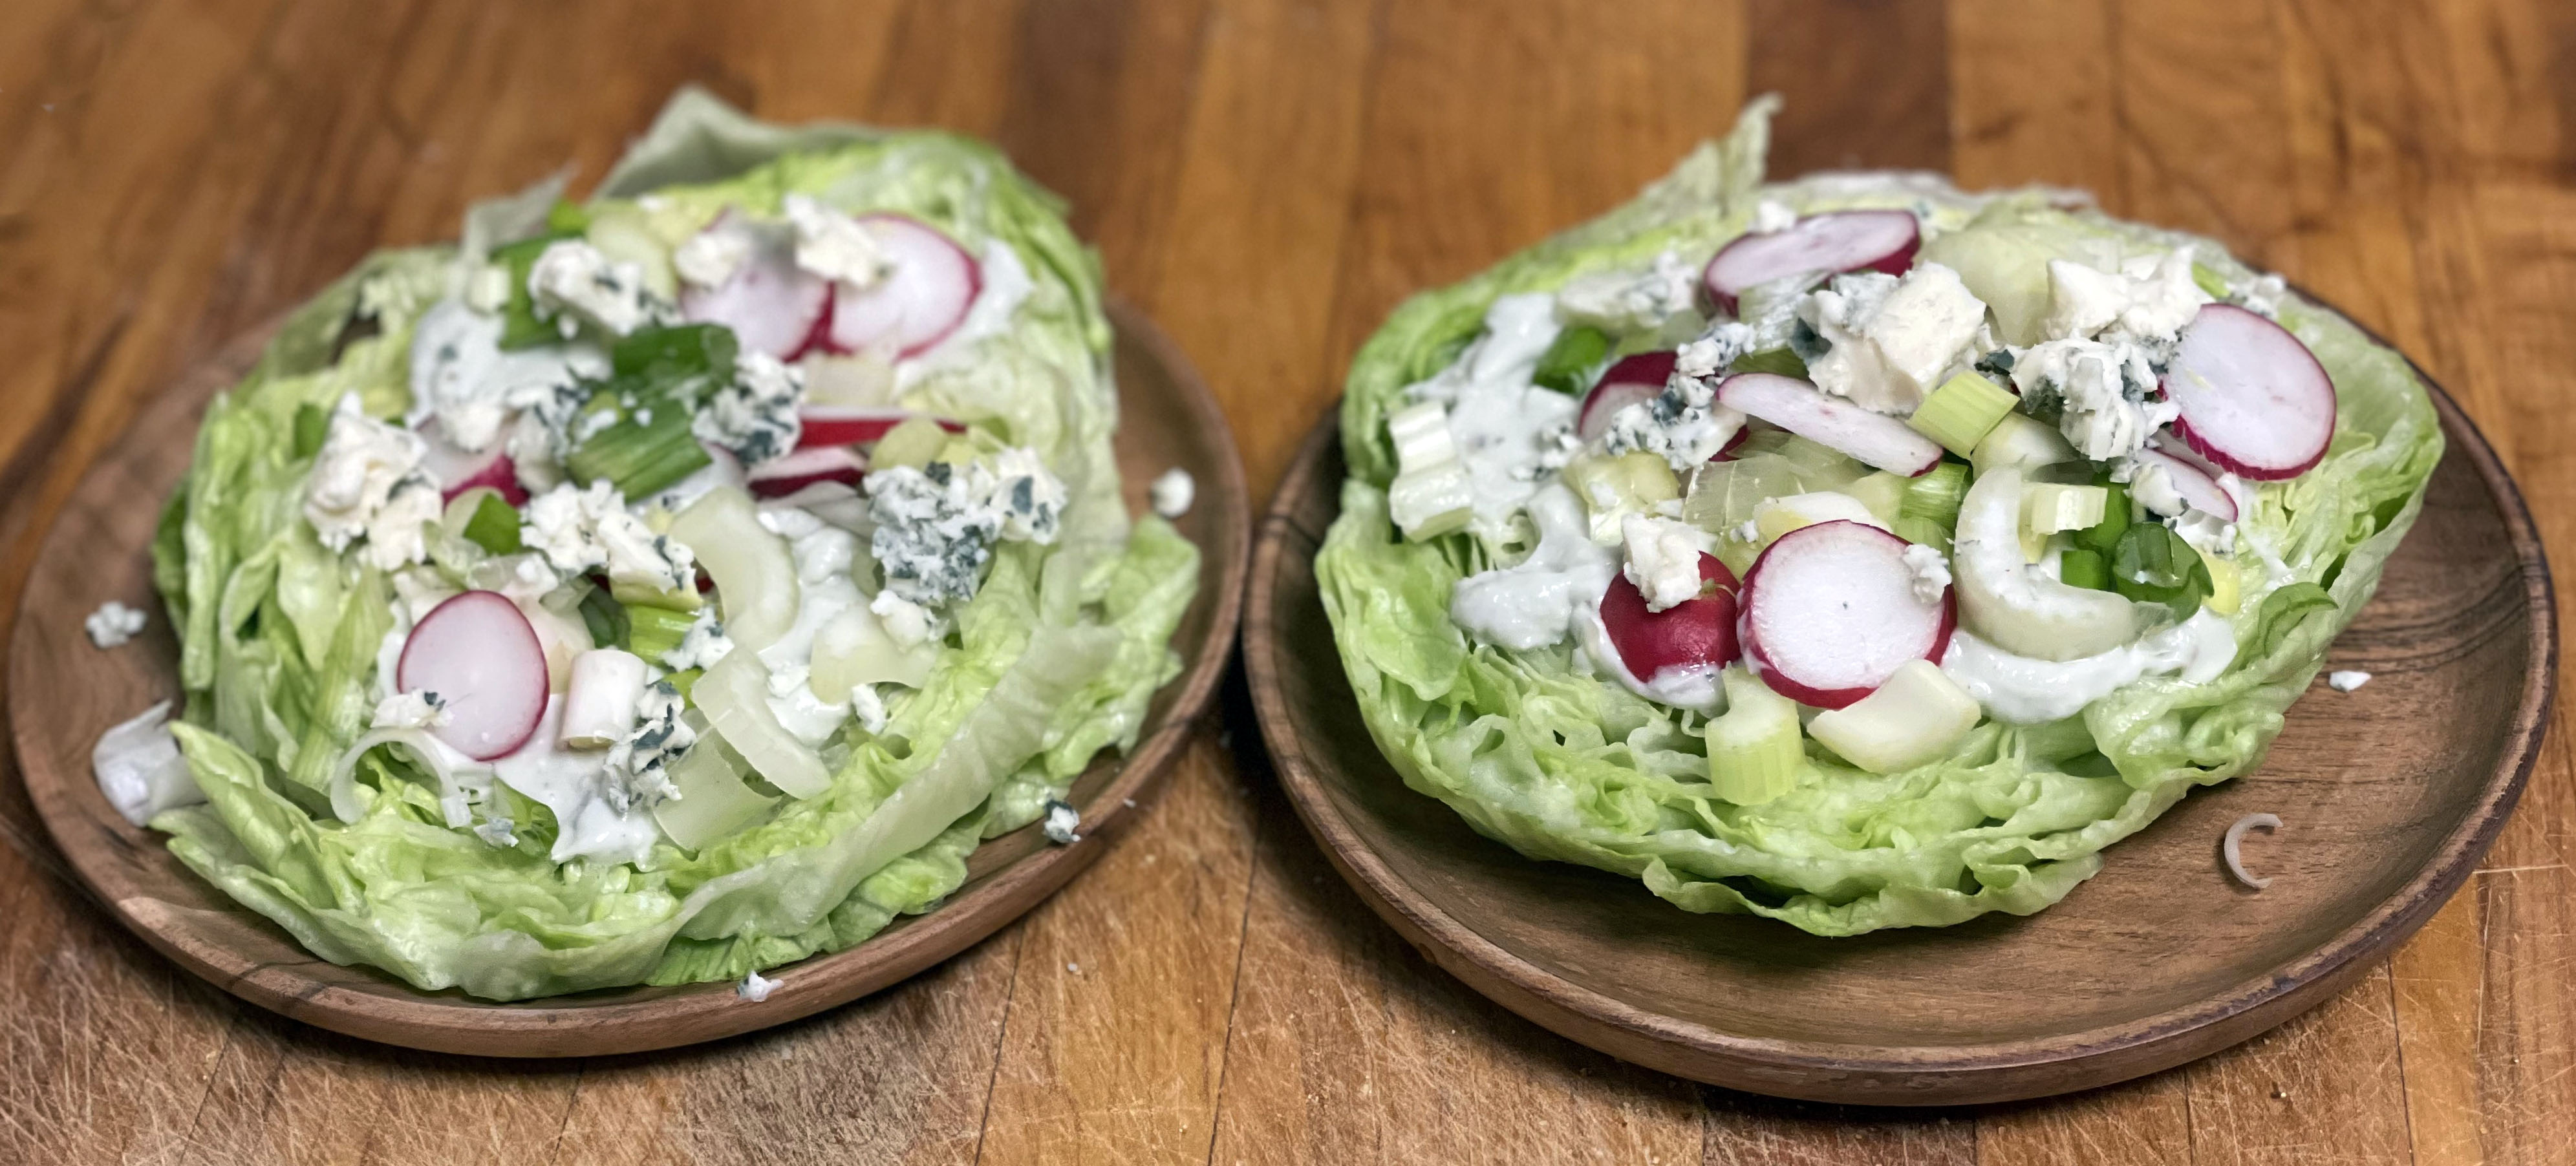
This recipe’s presentation is pretty impressive. And it’s as good as it looks! Interestingly I have steered clear of iceberg lettuce in recent years – opting instead for romaine or spring mix. Iceberg lettuce seemed so boring – so reminiscent of my childhood when my mother whacked an iceberg lettuce in wedges, threw it on a plate and passed around store-bought dressings.

I was wrong. Not only is the presentation of sliced rounds of lettuce striking, the lettuce stayed crispy and flavorful under the dressing and accoutrements. Not a blue cheese lover (I wasn’t either once upon a time)? Use your favorite dressing; keep the toppings and presentation!

Crunchy Iceberg Salad with Creamy Blue Cheese

For the dressing:

4 ounces Roquefort bleu cheese, crumbled

⅔ cup good mayonnaise, such as Hellman’s or Best Foods

⅓ cup plain Greek yogurt

1 tablespoon sherry vinegar

Kosher salt and freshly ground pepper

For the salad:

4 tender inside celery stalks, trimmed and slice crosswise ¼ inch thick

6 radishes, trimmed and sliced into thin rounds

5 scallions, trimmed, white and green parts sliced ¼ inch thick

1 large head iceberg lettuce, wilted outer leaves removed

4 to 6 ounces Roquefort blue cheese, crumbled

Fleur de sel, pepper

For the dressing, place 4 ounces of blue cheese in a small bowl and microwave for 15 seconds, until it begins to melt. Place the mayonnaise, yogurt, warm blue cheese, sherry vinegar, ½ teaspoon salt, and ¼ teaspoon pepper in the bowl of a food processor fitted with the steel blade and process until smooth. Set aside or refrigerate until ready to use.

For the salad, combine the celery, radishes and scallions in a bowl. Slice the whole head of lettuce across to make four ¼-inch thick round disks and place each on a dinner plate. Spoon the dressing on the lettuce and sprinkle on a quarter of the vegetable mixture. Distribute the remaining crumbled blue cheese on the salads, sprinkle with fleur de sel and pepper, and serve.

Muy Bueno!

15 Jan

When my four kids were growing up, this was the kind of main dish they would actually eat without complaining. I remember making a similar version of this – only it was a cheeseburger pie! This recipe is from Simply Simpatico (1992), billed as A Taste of New Mexico from the Junior League of Albuquerque. I do remember buying it because of one specific memory. I was attending a Fraternity Editors’ conference in Albuquerque and we had dinner one evening on an Indian reservation. Planned entertainment included rides in hot air balloons. I was terrified and tried to beg off but was talked into finally taking a ride. I vividly remember screaming the entire time as we rose in the air. Did I mention the balloon was tethered to the ground? Of course, we all know what happened to that hot air balloon in the Wizard of Oz. Need I say more?

In any case this recipe was a hit with the husband and – and it was even better the second day. Betting you could substitute ground turkey if you prefer. Look for Junior League cookbooks in your city! Real people, real cooks = really good food. One reason I have so many cookbooks is because for a while there I tried to pick one up in every city I visited. This one is still available on Amazon and other sites.

Main Dish Mexican Pie

1 pound lean ground beef

1 cup chopped onion

1 envelope taco seasoning mix

1 4-ounce can green chilies, chopped

1 cup Monterey Jack cheese, shredded

1¼ cup milk

¾ cup prepared biscuit mix (like Bisquick)

3 eggs

¼ teaspoon hot sauce

Preheat oven to 400 degrees. Lightly grease a 10-inch pie plate. In a skillet over medium heat, cook beef and onion until beef is browned; drain off excess fat. Stir in seasoning mix and spread mixture in pie plate. Sprinkle chilies and cheese over beef. Beat remaining ingredients until smooth about 20 seconds in blender or 90 seconds with a hand mixer. Pour egg mixture gently over mixture in pie plate. Bake about 25-30 minutes or until golden brown and a knife inserted in center comes out clean. Let stand 5 minutes before cutting. Garnish if desired with chilies or shredded cheese.

Nothing to snicker about…

14 Jan

Here’s a cookie to go with yesterday’s cocoa recipe. I’ve never made Snickerdoodles. Remember I’m not a big fan of baking – however I am a lover of this distinctive cookie. A simple recipe for this popular cookie caught my eye in yet another one of those cookbooks that I’m not sure how ended up on my shelf!

It’s titled The October Group of St. Peter’s Church presents the A B C’s of Cooking (1967). Chairmen of the cookbook project are listed as Lucy Schweiger, Osage, Iowa and Joan Marley, Riceville, Iowa. The recipe is actually very vague. No oven temp nor number of of cookies it yields – and not much direction on how to assemble. I did not prepare it as written – which can be risky for baking! Heres the recipe (attributed to Mrs. Forest Chambers)* and I’ll share what I did differently at the end.

Snicker Doodles (yes, recipe shows it as two distinct words!)

Melt together thoroughly:

1 cup shortening

1½ cups sugar

2 eggs

Sift together and stir in:

2¾ cups flour

2 teaspoons cream of tartar

1 teaspoon baking soda

½ teaspoon salt

Roll in balls the size of walnuts. Roll balls in mixture of 2 tablespoons sugar and 2 teaspoons cinnamon. Place about 2-inches apart on an ungreased baking sheet. Bake 8 to 10 minutes in moderate oven until light brown but still soft. They puff at first but flatten themselves, having a crinkled top.

(Okay, here’s what I did: using a hand mixer, creamed shortening, sugar and eggs until well blended. Combined flour, cream of tartar, baking soda and salt and added it to the mixture, beating until dough came together. I made them more like the size of golf balls – and I baked them at 325 degrees.)

Wow!!! These are even better than they look. Moist and crumbly on the inside, crunchy on the outside. I tried to find out an explanation why they have a funky name but none of the explanations rang true. Let me know if you try them!

*All the women who contributed to this book are identified as Mrs. (their husband’s first name), (their husband’s last name). I remember when I was applying for a JC Penney credit card nearly 47 years ago and my mother and I got into a major argument when she saw me write my first name on the form. “No,” she insisted, “you are now Mrs. Gerald Sandler.” Loved you mom, but no!

How sweet it is…

14 Jan

Cocoa Continental is today’s recipe – from Betty Crocker’s Cook Book for Boys and Girls (1957). I’ve cherished this book (it’s gotten a lot of wear and tear) since my childhood and have many happy memories of recipes I first cooked from this book. My best friend – then and now – was my cohort in the kitchen. She likes to remind me that if I burned something – it was always her fault! Me, wrong? Thankfully, I now admit to an occasional mistake! I think I was jealous that one of the young home testers listed in the book (there were 12) was named Randee, my friend’s name!

I remember making this for my big brother, Doug! Enjoy it with or without marshmallows. Even better in front of a fire!

Cocoa Continental

2 tablespoons cocoa

3 tablespoons sugar

⅛ teaspoon salt

½ cup hot water

2 cups milk or 1 cup evaporated milk and 1 cup water

Marshmallows (optional)

Blend cocoa, sugar and salt together in a saucepan. Then stir in hot water. Bring to boil over low heat and boil 2 minutes, stirring occasionally. Then add and heat the milk, but do not boil. Drop a marshmallow into each cup and pour hot cocoa over it.

Makes enough for 2 big mugs!

While original copies of this classic are scarce, there are later editions available online. https://www.amazon.com/Betty-Crockers-Cook-Book-Girls/dp/B007SRW6DW

Great way to introduce young cooks to the kitchen!

A Savory Salad

13 Jan

This recipe comes from Cooking the Vietnamese Way (1985), another Lerner Publications easy menu ethnic cookbook. This one is written by Judy Monroe and Chi Nguyen. (Note, I have 10 total of these ethnic cookbooks so expect to see more unusual recipes in the weeks ahead!)

I was anxious to try this one because it sounds like the vermicelli noodle salad we have enjoyed eating at the Lotus Restaurant in Minneapolis. We still miss their original location in Uptown. This recipe did not disappoint – and it was really easy to prep and assemble!

Note special ingredients: rice noodles and fish sauce can be found in the Asian food aisle in most grocery stores. You’ll find lemon grass in Asian grocery stores and specialty grocery stores like Whole Foods.

Rice Noodle Salad (Bun bo sao)

1 7-ounce package rice noodles

½ cucumber, peeled and thinly sliced

2 carrots, peeled and shredded

2 tablespoons vegetable oil

½ onion, peeled and thinly sliced

1-pound pork loin or beef sirloin tip, thinly sliced

1 stem lemongrass*, finely chopped, or 1 tablespoon dried lemongrass, soaked

1 clove garlic, finely chopped

½ teaspoon sugar

¼ teaspoon pepper

2 tablespoons fish sauce

½ medium head lettuce, shredded (about 2 cups)

½ cup chopped roasted peanuts

In a large saucepan, bring water to a boil over high heat. Add rice noodles and return water to a boil. Reduce heat to medium-high and cook noodles uncovered for 4 to 5 minutes or until soft. Drain noodles in a colander and rinse in cold water. With a sharp knife or scissors, cut noodles into shorter lengths. Divide rice noodles between 4 small bowls (or less).

In a large skillet, heat oil over high heat for 1 minute. Add onions and cook stirring frequently for 2 to 3 minutes or until tender. Add meat and stir. Add lemon grass, garlic, sugar and pepper. Cook, stirring frequently, 3 to 5 minutes or until meat is thoroughly cooked. Add fish sauce and stir well.

Divide lettuce, cucumber into each bowl. Divide cooked meat mixture between the four bowls (or less) and sprinkle 2 tablespoons chopped peanuts over each. Serve with Nuoc cham – recipe follows.

Nuoc cham

“The Vietnamese use Nuoc cham the way we use salt.”

2 cloves garlic, crushed

1 teaspoon crushed red pepper flakes

3 tablespoons sugar

2 tablespoons fresh lime juice or 4 tablespoons white vinegar

4 tablespoons fish sauce

1 cup water

Combine all ingredients in a small mixing bowl. Stir to dissolve sugar. (If sauce is too salty or strong, add another tablespoon of water and stir. (Nuoc cham will keep up to 2 weeks refrigerated in a tightly covered glass container).

Makes 1½ cups

Note, don’t be intimidated by lemongrass. While you can prepare the dish sans lemongrass – it adds a lot!

Copies of this cookbook are available online!

Cool beans

11 Jan

This recipe is from the Crystal Little League Cookbook (2013). It is a collection of recipes by Crystal (MN) Little League Families and friends. My husband was a (volunteer) district administrator for Little League in and around Minneapolis suburbs for 15 years! This cookbook was one of his parting gifts.

Black Bean Salsa

2 10-ounce cans Rotel chopped tomatoes with green chilies

1-2 15-ounce cans black beans, rinsed (I used only one!)

1 15.25-ounce can Mexican corn

½ red onion, chopped (about ¾ to 1 cup)`

2 green onions, chopped

1 teaspoon cumin

2-3 cloves garlic, chopped

Cilantro, chopped (to taste)

Mix all together. Chill. Serve with tortilla chips.

This salsa is the perfect “winter salsa” – especially now! In Minnesota we can only dream about summertime and fresh picked tomatoes and corn.  If you can’t find Mexican canned corn, look for a Southwest version – I found Kuners Southwest Sweet Corn & Peppers. Del Monte makes one as well.

Serve with tortilla chips – or better yet, make your own. Using a pizza cutter, slice corn tortillas in half and then in quarters and then in eighths. Spray a cookie sheet with non-stick spray and arrange chips in pan. Spray again with non-stick spray and sprinkle with kosher salt. Bake at 425 for 10-12 minutes or until chips are lightly toasted. Turn halfway through.

Don’t like cilantro? Don’t use it. Like/dislike of this herb is actually genetic. Chances are if you don’t like it, someone else in the family shares your dislike!

Note to WW members: Black Bean Salsa is zero points on all three color plans – and delish to boot!

Doesn’t look like this cookbook is still around for purchase – but again, do check out those local cookbooks put together as fundraisers for sporting teams, schools or the like. Real cooks, real good food.

A-peeling hash brown potatoes

10 Jan

This recipe comes from Let My People Eat (1976). Subtitled A Jewish Cookbook of Kosher Recipes, it was put together by the Congregation Beth Yeshurun Sisterhood in Houston, Texas. My good friend Linda Brandt gifted me this book – chockful of wonderful recipes by home chefs. This recipe caught my eye because while I love hash browns, my homemade attempts never turn out the way I would like. This version is a great fix ahead and addition to a brunch or really any meal! One caveat: season liberally.

Oven Baked Hash Brown Potatoes

8 large potatoes,

2 large onions, diced fine

¼ lb. butter, melted

Salt and pepper to taste

4 tablespoons fresh parsley

Boil potatoes with skins on until tender. Peel and cut into cubes. Mix with other ingredients and pour into a buttered 2-quart casserole. May be frozen at this point. Bake at 375 degrees until brown on top about 15-20 minutes. Optional: broil a minute or two to brown top.

Yield: 6 – 8 servings depending upon size of potatoes

Unfortunately, this cookbook is long out of print. Check out your local synagogue or church cookbooks for a treasure trove of recipes like this one – from real cooks like you and me!

Note: this was even better the day after. Reheat in a frying pan coated with oil.

Winner, winner, chicken dinner

10 Jan

This recipe was found in The Complete Chicken (1978) by Carl Jerome. Truthfully, I never get sick of eating chicken – as long as I keep mixing up how I prepare it. I always have chicken breasts in the freezer. I grind them in a food processor for chicken burgers, slice and add to stir fry, boil or roast for chili and pot pie and chop them up for chicken salad, fried rice and egg foo young. Of course, the easiest way to prepare chicken breasts is a simple sauté – using thinly sliced and pounded breasts. The author named this recipe for his Dutch friend, Alex from Amsterdam. While simple, the end result is delicious!

Alex Komen’s Chicken with Sesame Seeds

2 ounces sesame seeds (about ¼ cup)

4 boneless and skinless half breasts (about 1½ pounds)

Flour

6 tablespoons oil

Salt

Freshly ground pepper

Place the sesame seeds in a large skillet over medium heat. Shake the pan gently back and forth for 3 to 4 minutes until the seeds have toasted to a light, golden brown. Immediately pour onto a cold plate. Place each chicken breast between two sheets of waxed paper or plastic wrap. With a heavy cleaver or meat pounder, flatten the chicken to an even thickness of about ¼ inch. Remove the paper and trim any ragged edges with a sharp knife. Dust the chicken lightly in flour, shaking off any excess.

Pour the oil into a large skillet and set it over medium-low heat. When hot, add the chicken and sauté for 3 to 4 minutes, turning once or twice, until the chicken is cooked through and only lightly colored. Remove from the skillet and lightly season with salt and pepper and roll in the toasted sesame seeds. Serve immediately.

Note: I slice chicken breasts in half while still partially frozen. And while you may be tempted to use a non-stick skillet to prepare these chicken breasts – you’ll get a better browning and yes, flavor, if you opt for stainless steel or cast iron.

Next time? I would use Bagel Seasoning (Trader Joe’s) instead of solely sesame seeds for more color!

This complete volume for how to cook every part of the bird is still out there on used book sites and of course, Amazon. https://www.amazon.com/Complete-Chicken-Special-Cookbook-Cooking/dp/0394428226

This one’s a dud, full disclosure

8 Jan

If you’ve been following my cooking through my cookbooks journey, you already know I’m not fond of baking. For some reason – yeah, yeah, I know about human error but I try to be precise when I bake – yet I have more failures than successes. Like today’s recipe from Better Homes and Gardens Encyclopedia of Cooking, Volume 12, PAR to POP, (1971).  Love these “encyclopedias!” I picked them up over the years at various bookstores but never quite completed the entire set. I am missing four volumes! They proved to be very useful when I was writing food articles for the Kansas City Star decades ago. And yes, I still refer to them occasionally. This recipe popped out for a couple of reasons – love peanut butter, we had several jars of peanut butter on hand and – I had everything else I needed to make them in my pantry already!

First batch spread and looked more like sand dollars than cookies. Second batch (after I refrigerated them overnight) wasn’t much better, although the edges browned improving their look. But let’s be clear, they don’t look like the picture in the book! They are supposed to be puffy and resemble mini hand-held pies. These babies clearly do not.

Couple of reasons why I think they didn’t turn out as expected. I used natural peanut butter which is runnier. Two, I followed the directions as written to cut shortening and peanut butter – using a pastry cutter (something many of you are probably unfamiliar with!). While I’m not sure I recommend this recipe, if you’re game, use regular Jiffy or Skippy Creamy Butter, and combine all of the ingredients in bowl with an electric mixer (stand or hand) and process just until ingredients come together. Refrigerate overnight.

And don’t come back here and tell me they were awful. You’ve been warned.

Double Peanut Butter Cookies

1½ cups sifted all-purpose flour

½ cup sugar

½ teaspoon baking soda

¼ teaspoon salt

½ cup shortening

½ cup creamy peanut butter

¼ cup light corn syrup

1 tablespoon milk

Peanut butter

Sift together flour, sugar, baking soda and salt. Cut in shortening and the ½ cup peanut butter until mixture resembles coarse meal. Blend in light corn syrup and milk. Shape into a 2-inch roll (wrap in waxed paper); chill. Slice 1/8 to ¼-inch thick. Place half the slices on an ungreased cooking sheet. Spread each with ½ teaspoon peanut butter. Cover with remaining slices, seal edges with a fork. Bake at 350 degrees for 12 minutes. Cool slightly; remove from sheet.

Makes two dozen.

Don’t skimp on the shrimp!

8 Jan

I found this recipe in The Asian Kitchen by Lilian Wu (2001). I appreciate the ease of stir frying – especially when I take the time to prep all the ingredients ahead of time. It’s a beautifully illustrated cookbook with step by step directions and helpful ingredient explanations. Still available through Amazon and used book sites.

Stir-Fried Shrimp with Snow Peas

1¼ cups fish stock*

12 ounces raw tiger shrimp, shelled and deveined

1 tablespoon vegetable oil

1 garlic clove, finely chopped

8 ounces (2 cups) snow peas

¼ teaspoon salt

1 tablespoon dry sherry

1 teaspoon oyster sauce

1 teaspoon cornstarch

1 teaspoon sugar

1 tablespoon cold water

¼ teaspoon sesame oil

Bring the fish stock to a boil in a frying pan. Add the shrimp. Cook gently for 2 minutes, until the shrimp have turned pink, then drain and set aside. Heat the vegetable oil in a nonstick frying pan or wok. Add the chopped garlic and cook for a few seconds, then add the snow peas. Sprinkle with salt. Stir-fry for 1 minute. Add the shrimp and sherry to the pan/wok. Stir-fry for a few seconds, then add the oyster sauce. Mix the cornstarch and sugar to a paste with cold water. Add the mixture to the pan and cook, stirring constantly, until the sauce thickens slightly. Drizzle with sesame oil and serve.

Note: Any variety of shrimp will do but aim for medium-large (36-40 per pound) or large (31-25 per pound). Substitute cut up broccoli florets or asparagus for snow peas.

Missing? Onions. While I added a handful, more would have been even better!

Serves 4.

Don’t have fish stock? You can make your own by simply boiling shrimp shells in water OR you can use half/half water with chicken or beef broth.

Note: dry sherry is not the same as cooking sherry. Pick up a dry sherry in the liquor department. It will last for months. Ditto, sesame oil is not the same as vegetable oil. You will find it in the Asian food isle. Refrigerate after you open it. You may need to let the bottle sit for several minutes to liquify after it has been refrigerated.