Awesome sauce

5 Feb

Spaghetti and meatballs is one of those tried-and-true dishes that appeal to most everyone. When my kids were growing up I simply opened up a jar of Ragu or Prego – thinking it was “good enough”. But over the years I realized those jarred sauces were high in sodium and not much more than seasoned tomato sauce and I could probably produce a tastier, healthier version. And I have. But that doesn’t stop me from trying new sauces! I found an intriguing recipe for Marinara Sauce in the reissued Joy of Cooking (2019) mega book by descendants of the authors of the original Joy of Cooking (1931), Irma S. Rombauer and Marion Rombauer Becker. It’s a hefty 1165 page cookbook with 600 new recipes and more than 4,000 “revised and updated ones.” I find this new version even more intimidating than I did the original cookbook (a mere 849 pages) given as a wedding present to me and my husband by my California Strimling cousins, along with a copy of Joy of Sex (1972) by Alex Comfort (no, it’s not a cookbook!)

This classic cookbook contains all you need to know to cook just about anything – if you can lift it. The format of the recipes is unlike most other cookbooks. Recipes are written with ingredients placed in the instructional text at the time of their use. Like the original version, it has a red ribbon bookmark stitched into the seam – so you can mark your page – a nice feature.

I enjoy paging through this massive book when I watch TV. That’s how I ran across this simple sauce. I did not have fresh basil on hand so I added a teaspoon of dried basil – along with fresh oregano, that I did have. I opted for the six garlic cloves but I didn’t process all when I finished the sauce. I tend to overwhelm others with my passion for garlic. And yes, you can overdo a good a thing!

Marinara Sauce

About 2¼ cups

Combine in a large saucepan and bring to a simmer over medium-low heat:

2 pounds fresh plum or Roma tomatoes, peeled, and coarsely chopped, or one 28-ounce can whole tomatoes

⅓ cup olive oil

3 to 6 garlic cloves, to taste, halved and smashed

6 sprigs basil

6 sprigs parsley

½ teaspoon red pepper flakes

Simmer, uncovered, crushing the tomatoes with a potato masher or a wooden spoon to break them up, until the sauce is thickened about 10 minutes. For a smoother texture, you may pass the sauce through a food mill or puree in a blender or a food processor. Season to taste with: salt and black pepper

Note: you can also use an immersion blender to puree the sauce. And this is a sauce you can keep on the burner for a couple of hours to deepen the flavors!

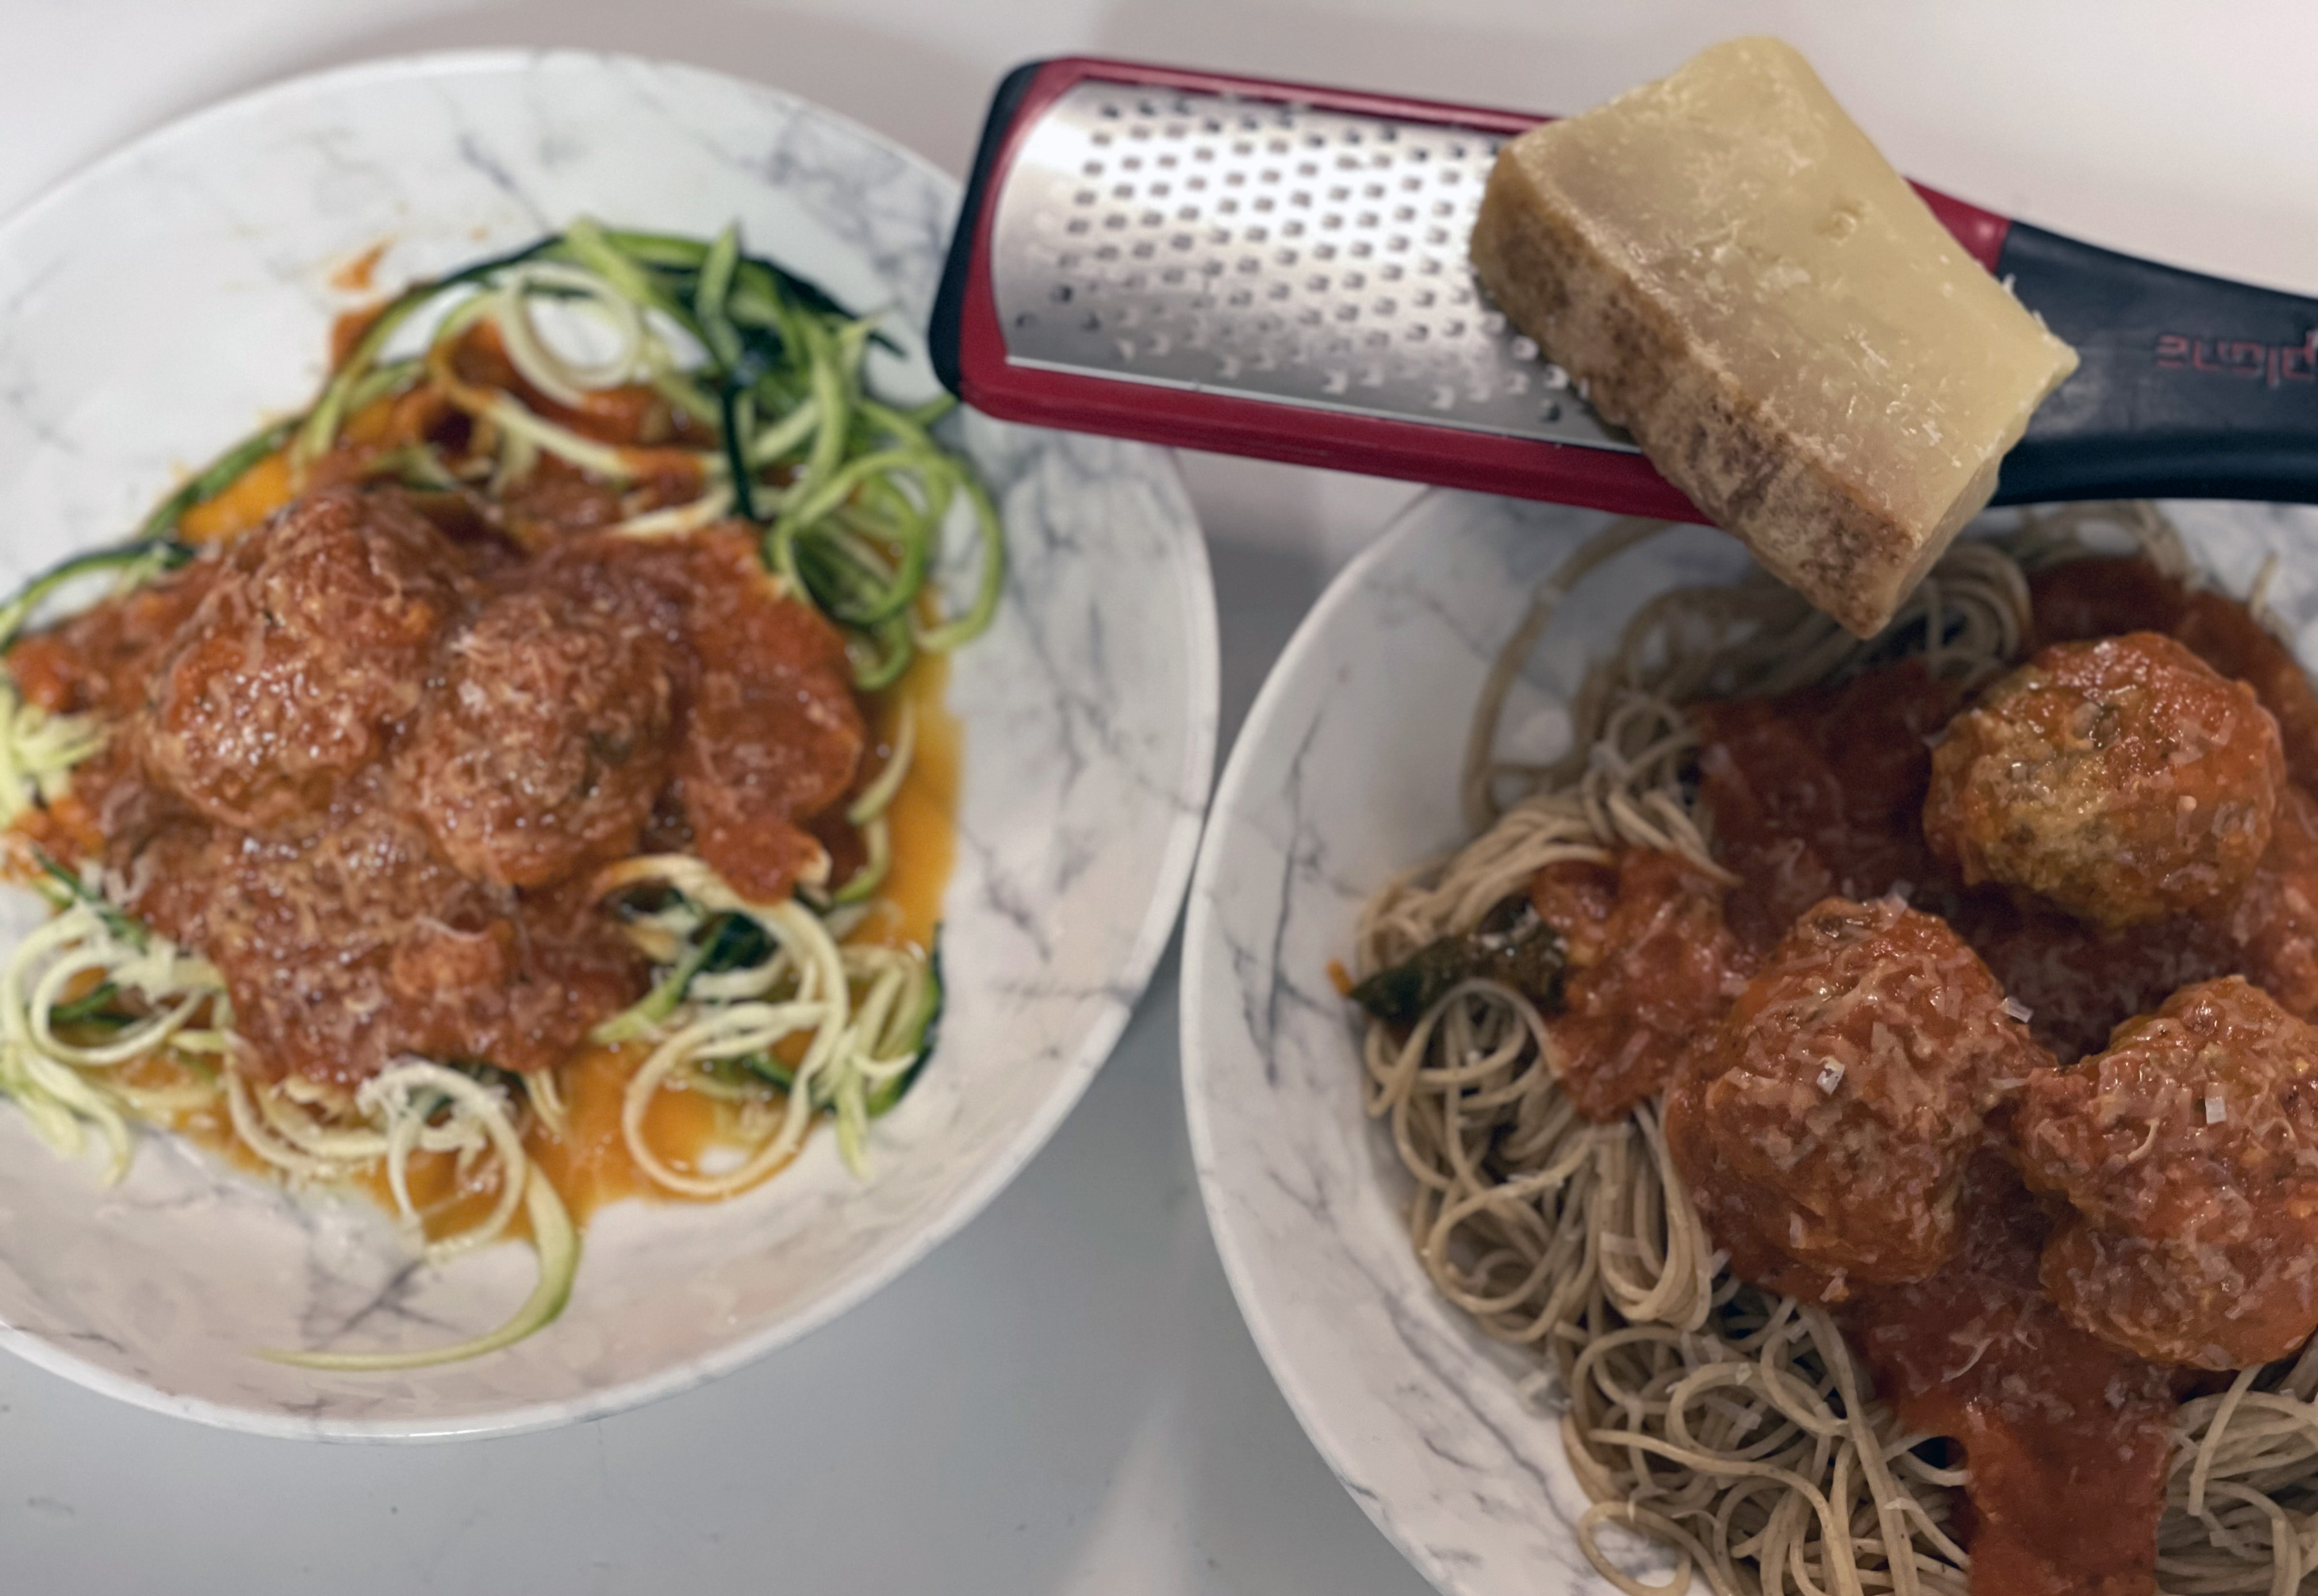
Pictured below: His and her pasta dishes. He likes whole wheat pasta; I opt for spiralized zucchini. Meatballs are a Lidia Bastianich recipe using equal parts veal, ground beef and ground pork. It’s a recipe I discovered watching the legendary chef on her PBS show when we were up North several years ago with our good friends, Bev and Howard, and had only three TV stations to watch. PM me if you want the recipe!

Life is just a bowl of cherries (jubilee)

4 Feb

My father loved to tinker around in the kitchen. His smoked turkeys and watermelon pickles were legendary. He pored over issues of Gourmet Magazine, and he loved to try whatever food fad was in vogue. A few of the culinary wonders he taught me – pairing Muenster Cheese with sliced pears, how to suck the juice from pomegranate seeds, the only way to eat beef is rare, plus he introduced me to a myriad of cuisines and ethnic dishes. Consequently I have a hard time eating, say a turkey sandwich for lunch. I would rather have an empanada or stir-fried tofu! I vividly remember when he first prepared Cherries Jubilee, setting it ablaze right on the stove – to my mother’s chagrin.

It’s actually very easy to prepare – and a bona fide gourmet dessert – which will have your guests dazzled over its simplicity and taste. This recipe is from Better Homes and Gardens Fondue and Tabletop Cooking (1970). I don’t have a chafing dish so I just warmed the brandy in the microwave, set it afire and combined it with the cherries.

Cherries Jubilee

1 16-ounce can pitted dark sweet cherries

¼ cup sugar

2 tablespoons cornstarch

¼ cup brandy, kirsch, or cherry brandy

Vanilla ice cream

Drain cherries, reserving syrup. In a saucepan, blend sugar and cornstarch; gradually stir in reserved syrup, mixing well. Cook and stir over medium heat till mixture is thickened and bubbly. Remove from heat; stir in cherries. (Optional: turn mixture into blazer pan of a chafing dish. Set pan over hot water).  Heat brandy in a small saucepan (or microwave). Pour heated brandy into a large ladle. Ignite and pour over cherry mixture. Stir to blend brandy into sauce. Serve immediately over vanilla ice cream.

One potato, two…

3 Feb

I will continue to sing my praises for Ina Garten! She makes cooking look easy and fun (as it should be!) – and every one of her cookbooks is a “must buy.” Her recipes are outstanding! And she supplies the tips you need to duplicate her results.

Cooking for Jeffrey by Ina Garten (2016) is one of her top five, in my humble opinion! Her Skillet-Roasted Lemon Chicken and Roasted Salmon Tacos are unbelievably tasty and have become family favorites. And my number one fav? Her recipe for a French 75 cocktail! I’ve now added a new fav to the list. Her Tuscan Roasted Potatoes are luscious! They are also a cinch to throw together and company appropriate. Feel free to cut the recipe in half – or double it. No fresh rosemary? Sprinkle on dried. Not a lover of fleur de sol? Skip it. Perfect accompaniment to beef, chicken or fish. And trust me they taste as good as they look!

Tuscan Roasted Potatoes & Lemon

2 pounds Yukon Gold potatoes, unpeeled and 1-inch diced

8 large garlic cloves, smashed and peeled *

2 large or 4 small branches fresh rosemary

½ large lemon, cut in half through the stem and thinly sliced crosswise

3 tablespoons good olive oil

Kosher salt and freshly ground pepper

Fleur de sol

Preheat the oven to 375 degrees. Place the potatoes on a sheet pan, add the garlic, rosemary, lemon, olive oil, 2 teaspoons kosher salt, and 1 teaspoon pepper and toss until everything is coated with oil. Spread out in one layer.

Roast for 50 to 60 minutes, turning the potatoes with a metal spatula every 20 minutes, until the potatoes are browned and crisp on the outside and tender inside. The garlic will be browned and sweet and the lemon slices will be caramelized. Discard the rosemary branches, sprinkle with fleur de sel, and serve hot.

*Smash each garlic clove lightly with the side of a chef’s knife to remove the peel, then smash again.

Use your noodle(s)

2 Feb

I found this funky paperback cookbook in my collection – another one that I don’t remember acquiring –  titled Celebrity Kosher Cookbook (1975) – and subtitled “A Sentimental Journey with Food, Mothers and Memories” by Marilyn Hall and Rabbi Jerome Cutler.

The recipe I tried was a winner. It was submitted by Norm Crosby, a hilarious comedian who passed away last year at 93. Noodle pudding is also known as “kugel” – which originated in Germany. It’s a baked casserole with starch (usually noodles or potatoes), eggs and fat. Kugels have many variations, from savory to sweet. This noodle pudding is on the sweet side and would make a great brunch, lunch or dinner side dish. It was also incredibly delish cold for breakfast the next day!

Noodle Pudding

2 eggs

1 4-ounce carton whipped cream cheese

½ teaspoon salt

Dash pepper

½ cup milk

½ cup sugar

½ cup raisins

¼ teaspoon cinnamon

8 ounces flat noodles, cooked and drained

Beat eggs and add cream cheese, salt, pepper, milk, sugar, raisins and cinnamon. Gently fold in noodles. Pour into buttered 1-quart casserole. Bake 1 hour in 325 degree oven.

Ultimate Pizza Party

1 Feb

I remember meeting the legendary Mama D years ago in her Dinkytown (University of Minnesota) restaurant. In the 70s there were three – count ’em three Italian restaurants on the University of Minnesota campus – Sammy D’s, Vescio’s and Valli. Mama D had helped her sons set up their Dinkytown restaurant – Sammy D’s – in 1966 (which eventually was renamed for the family matriarch). She opened Ristorante Italiano in St. Anthony in 1983. Mama D’s Dinkytown restaurant closed in 2001.

I treasure my Mama D’s Homestyle Italian Cookbook (1972) by Giovanna D’Agostino (aka Mama D). My pizza preferences have changed over the years. I now opt for thin crust and flatbread type pizzas but it was fun to walk down memory lane making pizza pretty much like what I grew up eating. Not thin, not thick, but somewhere in between – covered in red sauce. Definitely delicious – especially with sliced pepperoni!

Tip: If you plan to make pizza – any pizza – it helps to have the right equipment – e.g. pizza stone and a pizza peel. The latter you use to move the pizza from your cutting board to the pizza stone in the oven. I roll out the dough directly onto parchment paper and transfer it all to the pizza stone.

Pizza (and Basic Tomato Sauce)

1 package dry yeast

Warm water

4 cups flour

1 teaspoon salt

1 teaspoon sugar

½ cup oil

Basic Tomato Sauce (following)

Salt, pepper, oregano and minced garlic to taste

Grated Parmesan cheese

Grated mozzarella cheese (I used 8 ounces)

Dissolve yeast in 1 cup water. Mix the flour, salt and sugar in a bowl. Make a well and pour in the oil. Add yeast mixture and mix thoroughly. Knead the dough until it is soft and pliable. Add more warm water or flour to make it smooth; kneading well, until dough leaves the sides of the bowl. To test, press a finger into the dough. When indentation pops back, dough is ready. Place the bowl in a warm place and let the dough rise until doubled in size (about 1½ to 2 hours). Cover with a cloth until ready to roll out. (To make 2 small pizzas, divide dough into two balls.)

Preheat oven to 400 degrees. Lightly grease a cookie sheet or large pizza pan. Roll out dough to the size of the pan(s), about ⅛-inch thick, and place on pan. Prick dough lightly all over with a fork. Spread tomato sauce on top. Season with salt, pepper, oregano and garlic. Sprinkle with cheeses. Bake for about 30 minutes, or until done.

Basic Tomato Sauce

1 29-ounce can plum tomatoes in puree

1 large onion, chopped

¼ cup oil (or less)

Salt, pepper, oregano and minced garlic to taste

Chop tomatoes finely or puree in a blender or food processor. Sauté onion in oil, add salt, pepper, oregano, garlic and tomatoes. Simmer sauce for 15 minutes.

Note: For variety, you can add any or all of the following to your pizzas before baking: sliced mushrooms, sliced pepperoni (my choice), whole or chopped anchovies, chopped sweet pepper.

Fun fact: the book cost $5.95 and Mama D autographed my copy!

Thanks for the memories…

31 Jan

In an earlier post, I shared a recipe from my beloved Betty Crocker’s Cook Book for Boys and Girls (1957). Today’s recipe comes from a book even older than that one – a book I have been searching for for over 60 years and lo and behold I found it on Ebay last week. Looking at the cover I knew instantly that this was the missing piece of my childhood, and I gratefully paid $20+ to get it. When it arrived in the mail the other day, I asked my husband to watch as I opened the book to be a witness that the recipe stuck in my head for all these years was in fact inside. And there it was, named differently than I recollected, but “the recipe.”

The Campbell Kids at Home (1954) doesn’t bill itself as a cookbook but it does include several recipes, – peanut butter sandwiches, hot cocoa and the salad. The book finds those apple-cheeked Campbell kids (yes, they used to be the face of Campbell’s soups, etc.) preparing lunch while their mother finished her sewing. What I remember as a “candle salad” is actually a Flagpole Salad (for one). I cannot begin to express how happy I am having this book back in my possession. I joked with my husband, “who knows, maybe it is “my” book.

Here’s that recipe. I can’t wait to share the book with my grandchildren post pandemic!

Flagpole Salad (For One)

1 lettuce leaf

1 pineapple slice

½ banana

Mayonnaise (I opted for Reddi-whip!)

Cherry

Put the lettuce leaf on the plate. Lay a slice of pineapple on it. Stick one-half banana in the hole of the pineapple slice. Top the banana with a bit of mayonnaise (or Reddi-whip). Then top with a red cherry.

“listen”

Steak this out.

30 Jan

Today’s recipe comes from A Knife For All Seasons (1981) by Nancy Elmont. It’s a collection of recipes and of course, carving techniques. The book is obviously an advertorial for the Hamilton Beach electric knife which was a pretty big deal back in the 60s and 70s. I am not sure how it ended up in my cookbook collection because ironically at the time this book was published I was working for Chicago Cutlery, then a Minneapolis-based kitchen knife manufacturer, as a marketing director and I didn’t own an electric knife! Copies are still available on Amazon.

I always keep a flank steak or two in my freezer because they are so easy to prepare. This marinade needs to work it’s magic for the full recommended time!

Flank Steak Teriyaki

2½ cups unsweetened pineapple juice (depending on your container, you may use less)

⅓ cup soy sauce

1 (1½ to 2 lb.) flank steak

In large shallow pan, stir together pineapple juice and soy sauce to make marinade. Add flank steak and refrigerate for 1 day, turning once. Remove steak from marinade and cook on a grill over hot coals or broil to desired degree of doneness (yes, we like it rare!) To carve, cut across the grain of the  meat.

Real men do eat quiche.

29 Jan

I love, love, love quiche. Particularly the traditional Quiche Lorraine. Over the years I’ve sought out restaurants that serve quiche and of course, learned how to make them myself. And just for the record, my husband loves quiche. So never mind that 1982 book by Bruce Feirstein with the inflammatory headline – Real Men Don’t Eat Quiche.

This quiche recipe I found in The Cook’s Store (1978), by the editors of Consumer Guide. It’s the subtitle that did it – How To Buy And Use Gourmet Gadgets. I was already fancying myself a “gourmet cook” that many years ago. Fun book chock full of gourmet equipment must-haves – everything from cutlery and serving pieces to bread pans, graters and roasting aids. Copies are still available on used book sites!

Yes, you need an actual quiche dish. You will find a myriad of other uses for it, so make the investment. The book recommends – and I concur – a 9-inch porcelain dish. The fluted edges shape the pastry and give it a distinct look. Be sure to read through the recipe in its entirety before attempting!

Fresh Herb Quiche

Pate Brisee (recipe follows)

5 slices bacon, cut into pieces

3 ounces Gruyere or Swiss cheese, thinly sliced (or shredded)

2 eggs

2 egg yolks

1½ cups whipping cream (or use half whipping cream and half light cream)

1½ tablespoon finely chopped fresh herbs (chives, rosemary, sage, basil, tarragon) or 2 teaspoons dried herbs

½ teaspoon salt

2 tablespoons butter

Prepare Pate Brisee pastry shell. Allow about an hour to make pastry shell. Preheat oven to 375 degrees. Cook bacon* in skillet until crisp; drain. Scatter bacon in bottom of pastry shell. Arrange cheese over bacon.

In a mixing bowl, beat together the eggs, egg yolks, cream, herbs and salt. Pour egg mixture over cheese and bacon. Dot with butter, Bake until top is golden and puffy and knife inserted in center comes out clean, 25 to 30 minutes. Serve warm or cold.

Pate Brisee

1 cup all-purpose flour

⅛ teaspoon salt

5 tablespoons butter

1 tablespoons cold water

Place 1 cup flour and salt in bowl. Cut in butter until small particles are formed. Gradually add water and work dough into a ball. Place on a lightly floured surface and knead gently several times. Dust with flour and wrap in a plastic bag; refrigerate about 30 minutes.

Roll out dough on lightly floured surface to ⅛-inch thickness. Roll dough around the rolling pin and unroll over a 9-inch porcelain quiche pan. Gently press dough into form, being careful not to stretch dough. Pass rolling pin over top to remove excess dough. Chill thoroughly.

Line the shell with parchment paper, allowing paper to extend over sides. Fill with pie weights or dried beans**. Bake at 400 degrees 10 minutes. Remove paper and weights and bake 2 to 3 minutes longer. Cool slightly before filling.

*Tip one: I bake a whole pound of bacon on a wire rack on a jelly roll pan with sides – 400 degrees about 20 minutes. Wrap cooled slices individually to use for breakfast (zap in microwave about 15 seconds per slice) – or for making this quiche or other dishes (chop while frozen, no need to defrost).

**Tip two: No beans, no pie weights? I used raw Arborio rice. You can also use premade pie crust (like Betty Crocker) – and skip the Pate Brisee prep!

Corn-fed

28 Jan

Today’s recipe was found in Great Home Cooking in America by the Food Editors of Farm Journal (1976). This book offers recipes from 200 years of great home cooking in America. Apparently people in all the American colonies ate some type of corn pudding over the years. Remember 1976 was the United States Bicentennial! This version is a rich, velvety custard flavored with corn. My take? Think Stouffer’s Corn Souffle (only fresher and you know what it’s made from!).

Trying to sell your children on more veggies? This one might do the trick. Call it yellow pudding! Seriously, easy to make and a great accompaniment to any main dish!

Corn Custard Pudding

2 cups frozen corn, thawed, or fresh kernels, cut from cob

1 egg

1½ cup half-and-half

¼ cup flour

1 tablespoon sugar

1 teaspoon salt

⅛ teaspoon pepper

Combine all ingredients in electric blender container. Blend at high speed 30 seconds (or until smooth). Pour into ungreased 1½ quart casserole. Place in pan of hot water*. Bake at 350 degrees 1 hour 10 minutes or until knife inserted in center comes out clean. Serve at once.

*You will need a pan large enough to hold casserole (I used a standard 9-inch x 13-inch metal baking pan). Fill pan halfway with water and place in oven while preheating. Then place casserole in center of pan. Once cooked, remove casserole carefully with oven gloves – both pan with water and casserole will be hot!

Copies of this historical cookbook are available on multiple used book sites.

Oh Fudge

27 Jan

I couldn’t resist trying (and note, trying doesn’t mean I succeeded) making chocolate fudge. Betting I last made it more than 25 years ago when my kids were little. Now I know why I haven’t made it since. What did I learn? It takes time to bring fudge to a soft boil stage without burning the chocolate – like 15 minutes! And beating should be done by hand, not by a electric mixer. Trust me on this last one, fudge went from glossy to dull in minutes.

Still want to try your hand at this perennial favorite? This recipe is from the C and H Sugar Complete Dessert Cookbook (1981). The book is still available on used book sites.

Chocolate Fudge

3 cups powdered sugar

1¼ cups milk

4 ounces unsweetened chocolate or ½ cup unsweetened cocoa powder

2 tablespoons corn syrup

¼ cup (½ stick) butter or margarine

1 teaspoon vanilla

1½ cups coarsely chopped nuts (optional)

Grease 9-inch square pan. Combine sugar, milk, chocolate and corn syrup in 3-quart heavy saucepan. Stir over medium heat until chocolate melts and sugar dissolves. Wash down any crystals on sides of pan with brush dipped in cold water. Boil to 236 degrees on candy thermometer (soft ball stage). Remove from heat; add butter and mix by swirling pan, not by stirring. Set aside until lukewarm (110 degrees). Add vanilla and beat 10 to 15 minutes until candy thickens and begins to lose its gloss. Quickly stir in nuts and spread in pan. Cut when set.

Note: Bless my husband, he thought the fudge was a winner! Personally, next time I get a craving, I’ll head to the next tourist site and buy some!